
Google Cloud Print feels a bit fiddly to set up, the first time. The following instructions should see you through – but if you find something wrong, don’t panic – just keep trying, and double-check the details. Almost all failures we’ve ever seen have been due to missing something that is mentioned below…
Final note before beginning: every WordPress installation might need its own, unique Google API project (that’s a unique API project, as in the notes below, not a unique Google account) . Google have not documented this anywhere, but several users have found that access to their Google access can randomly fail unless this is done. This might be a glitch somewhere in the innards of Google – but it can’t be fixed from this end, so if you find a problem, you should do this.
1. Visit the Google API console, and create a new project
To allow access to your Google Cloud Print printers, click on the link to your API console to take you to Google; then open the “Project” menu:
Use the drop-down “Project” menu:

Press the button (on the right) for a new project:

Then fill in this form by entering a project name of your choice (and for the project ID, just use whatever project ID Google suggests – it does not matter)…

2. Go into the settings to manage API credentials
Now, go to the “Identifiers” section (using the menu on the left). You should then see something like the first screenshot below. Or, if you have already gone into the project management section, follow the “Access API overview” link as shown at the bottom of the second screenshot.

3. Set up API access credentials (OAuth)
Now that you are in the “Identifiers” tab, click on the “Create credentials” button (towards the top-right corner of the screenshot below), and choose the “OAuth client ID” option:


You will probably be told that you need to give your application a name. You should do this. If asked about user type, choose any of the options that is available. You may be asked for some details of the website you are using:

When you have saved those details, go back to the “Credentials” (or “Identifiers”) screen and click to create an OAuth identifier/credential again (as in the earlier screenshot):

Choose “Web Application” as the application type:

Next, enter some details:
- For the name, enter any label you please – it does not matter.
- When asked, paste in (as the “Authorized redirect URI”) the URL that was shown to you on your Google Cloud Print settings page back in your WordPress admin console: (do paste it from there – don’t copy any screenshot below).
- For the “Authorized JavaScript origins”, enter the same thing but remove everything after the initial host name in the URL. i.e. something like http://www.example.com
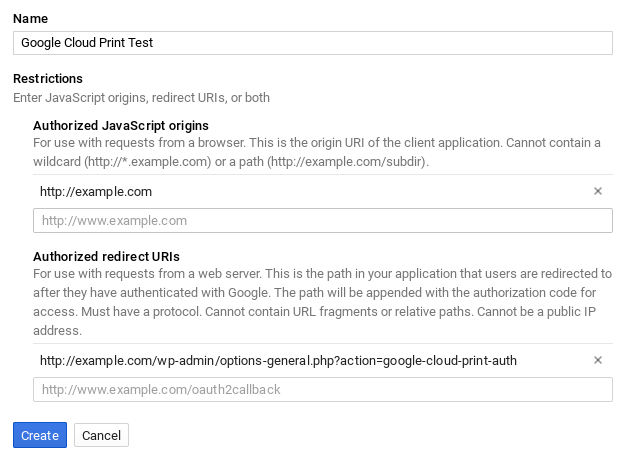
Then press the “Create” button.
You will then be shown your client ID and secret.

5. Go back to your WordPress dashboard, and enter the details
You should now have a client ID created. Paste the details back into the Google Cloud Print settings page in your WordPress admin console. (Don’t copy our ones from the screenshot above – they are just an example, and will not work for you!). Save the settings.
Then (i.e. after saving the settings), follow the link that WordPress will show you, to complete authorisation.

Google will then show you a screen to confirm the authorisation. The screenshot may not be identical to the one below:

If you see an error “redirect_uri_mismatch”, then you mis-copied the URL back in step 4… go back and correct it, and resume from that point.
After doing this, you’re done.
Not yet taken a look at our automatic/instant order/invoice/delivery note printing plugin for WooCommerce? Read more about it here…