
WooCommerce Opening Hours and Delivery Times – Documentation index
- General questions which apply to all our commercial WordPress plugins
- Specific questions about this plugin
Questions applying to all our commercial WordPress plugins
How long do you provide access to new plugin releases and support for?
All plugin purchases come with included access to support and access to downloads for 12 months. After 12 months, you can renew access if you want to.
If you do not want to renew, then your existing plugin will not be de-installed or de-activated or changed in any other way. Of course, we cannot guarantee what level of compatibility it will have with future releases of WordPress or (if relevant) WooCommerce.
Do you have a trial version of your plugins available / what is your refund policy?
We do not have trial versions of our plugins available, or refund trial purchases. However, we are committed to providing support for any technical issues you have with any of our plugins, and all plugins include 12 months of support. If the plugin does not do what the product description says it does, then you can have a refund (this should be requested within 10 days of purchase), subject to allowing us to investigate the problem.
This policy specifically excludes third-party failures; for example, if a plugin depends upon a third-party service which malfunctions or closes down, you will not be eligible for any refund for the plugin purchase. It also explicitly excludes failed attempts by the customer to implement PHP code customisations to the plugin, and faults in third-party code. Refunds are not offered for “speculative” purchases where the customer is hoping that the software can do something which is not advertised; plugins are priced cheaply and you should check your requirements before purchase. This policy allows us to keep prices down for our customers (i.e. means they don’t subsidise the support and non-refundable-to-us transaction fees for speculative purchases that get refunded).
For EU customers, your right to a refund of digital goods that you have not requested a download of remain intact. You can request a refund of goods that have not yet been downloaded for up to 14 days after purchase. These requests will be verified using our download logs.
How can I download a PDF invoice/receipt for my purchase?
You can download a PDF invoice/receipt for plugins purchases from your account page, here.
How many licences should I buy?
You will need a separate licence for each individual WordPress installation which you wish to receive plugin updates (i.e. future releases), or to request support for.
A WordPress Network is a single installation of WordPress, so only requires one licence, regardless of how many blogs you have on the network.
What is your support and updates policy?
All customers will have access to future releases of the plugin, and for support to help with trouble-shooting, for 12 months.
Whilst we are happy to give general advice as part of support, support has reasonable limits. For example, hiring a developer (if one is available) to extend or customise the plugin for you, or trouble-shooting problems in other plugins on your site (or other things beyond scope – e.g. problems in your printer, or other third-party products), is not included in the purchase price.
Note that this does not affect your ability to continue using an installed plugin. Your installed plugins will remain installed forever. What is limited to 12 months is access to our future work on the plugin and support.
Can you write some code for me, to customise the plugin?
Plugin purchase prices do not include hand-written code, even if it is only a few lines.
At commodity prices, and including 12 months of updates to new versions (including compatibility with future releases of WordPress and (where relevant) WooCommerce), and personal support, the margins when selling plugins are small. As a result, plugin sellers rely upon selling to many customers – and personal customisations are not economic (even if potentially useful for other customers).
You are, of course, welcome to send in ideas for new features. If you need a developer to customise for you, though, then we suggest Codeable – https://codeable.io – where there is a large marketplace of WordPress and WooCommerce experts offering their services.
Where can I download my plugin purchase?
After purchasing one of our WordPress plugins, you can download from any of three or four places:
- The “thank you” page in your web browser, that appears immediately after completing payment.
- From your Simba account, here.
- Using the link in your order confirmation email.
- If you have already installed and begun using the plugin, you can obtain updates (when available) from the “Plugins” page in your WordPress dashboard.
How do I install my plugin?
If you’ve purchased one of our WordPress plugins, then thank you! Here’s how to install…
1. Go to the “Plugins” page in your WordPress dashboard, and press “Add New”

2. Press the “Upload Plugin” button

3. Press the button to select a zip file. Select the zip file for your plugin. Then press “Install Now”.

4. When the plugin has uploaded, press the “Activate” button.

N.B. If you have the free version of any of our plugins (e.g. WooCommerce EU VAT Compliance, or Two Factor Authentication), then you should also de-activate and de-install the free version. Your settings will be retained by the paid version. It does not matter whether you de-activate and de-install before, or after, installing the paid version.
When buying a plugin, what is the difference between manual or automatic renewal?
All our plugins come with included access to personal support and updates (new versions of the software) for 12 months (more information). After this 12 months, you can keep on using the software, without any restrictions. However, if you want to renew, you can either do so manually (i.e. come back to the shop and make a fresh purchase) or automatically (i.e. an order will automatically be created and emailed to you, and payment taken if you have a payment method on your account). We offer a discount to those who choose automatic renewal. You can cancel a subscription at any time (yes, even 5 minutes after you purchased it).
Where can I see the plugin changelog?
For a plugin that you have purchased, the changelog is in the file “readme.txt” in the plugin zip.
For our current on-sale version (i.e. the latest version), you can see the changelog by going to the shop, and then going to the product page, and then clicking the link “Plugin changelog” from the left-hand side of the page.
How do I change which site is using a licence?
If you wish to stop using one of your plugin licences on one site, and instead use it on another, then do this:
1. Disconnect the “old” site.
Go to the “Plugins” page in the WordPress dashboard, and find the plugin’s entry. Press the “Disconnect” button.

2. Connect the “new” site.
Go to the “Plugins” page in the WordPress dashboard on the new site, and connect.

I have found a problem in the plugin, or a question not answered here. Where do I get personal support?
Please go here and open a support ticket. (Or, if you forgot your login details for your account with us, then please go here).
Is this plugin still supported and maintained?
Yes. If it ever stops being, then we would withdraw it from sale.
WooCommerce Opening Hours and Delivery Times
How can I customise the plugin’s behaviour or particular messages?
Beyond the settings (which you can find in WooCommerce -> Settings -> General in your dashboard), the plugin has many hooks for WordPress developers to use, which allow editing both of the plugin’s behaviour and of any particular messages it shows the customer.
As well as discovering them through inspection of the code, developers can find them described under the “Developer’s Information” section on the product page, together with examples and a link to a tutorial. Go to that section to see how it’s done.
To customise WooCommerce email templates used by the plugin, copy the email template (from the subdirectory “wootemplates” within the plugin’s directory) into your child theme, using the WooCommerce documentation available here. For example, if editing the “email-addresses.php” template, this would be copied to wp-content/themes/(your child theme)/woocommerce/emails/email-addresses.php . Then you can edit it as you will.
Please note that your purchase of the plugin does not include the cost of providing customisations for you.
What code can I use to add mention of the time to a customer email?
The plugin will automatically over-ride the default WooCommerce email templates in order to include the chosen time in emails to both site owners and customers. However, if you are using some other email tool which over-rides this further, and in which this is not shown, there here is the code that you will need; you may have to ask the supplier of your chosen WooCommerce email creation tool how it can be used with their tool:
global $woocommerce_opening_hours;
$time = $order->get_meta('_openinghours_time', true);
if ($time && 'noorders' !== $woocommerce_opening_hours->get_customer_choice()) {
  echo '<strong>'.__('Time chosen', 'openinghours').':</strong> ".$woocommerce_opening_hours->get_display_time_from_meta($time);
}
What versions of WooCommerce and WordPress does the plugin support?
Please check the up-to-date information on the product page, here. We will always support the latest versions, and usually going back approximately 3 years from that. Please do make sure that you are running the current, and not a very out-dated, version of our plugin before requesting support from us.
How can I configure an opening time that spans midnight?
If you are open from before midnight until after it, then you should enter two separate sets of opening hours: one that ends at midnight (which is entered as 24:00), and the second of which begins at the start of the next day (entered as 00:00), as in this screenshot (in which the shop is open from 8pm until 4am the next day):

Is this plugin compatible with WooCommerce HPOS (high performance order storage) ?
Yes, releases from May 2023 onwards have added full support for WooCommerce high performance order storage (also known as custom order tables).
Where do I download the plugin from?
You should have been shown a download link immediately after purchase; the link is also in your order receipt email. If you have not got either of those, then you can download it from your account page, here.
How do I apply a cut-off time for next-day service (but allow them to choose any time the next day)?
To do this, you will need version 1.5.18 or later of the plugin (October 2015). This adds a new capability to make the “minimum order fulfilment time” vary, depending upon what the time is now, and adds the ability to make that clock not start ticking until the shop first opens. This opens up all kinds of possibilities – some of which would make little sense, but others do!
In this example, we have a shop that customers can collect orders from at any time from 10.00am to 6.30pm (i.e. 10:00 until 18:30, on the 24-hour clock). The shop owner wants people to be able to pick up from the next day onwards, at any time, but only if they order before 18:30. If you order after 18:30, then you can’t pick up the next day, and will need to wait until the day after that.
To do that, you need a minimum order fulfilment time that:
- Does not allow any times to be chosen from ‘today’ in any case
- Does allow you to choose a time from tomorrow, as long as it’s not yet 18:30.
To do that, you:
- Enter a minimum order fulfilment time that equals the length of time that the shop is open during the day – which is 8 hours and 30 minutes = 8*60 + 30 = 510 minutes. (This will mean that the first criteria above is partially fulfilled – it’ll hold as long as the time today has reached opening time).
- Choose the option to “Count the minimum fulfilment time beginning from the time that the customer is ordering”. This now causes the first criteria above to be fully fulfilled.
- Enter 18:30 in the “if the time has gone past” box, and enter the number of minutes from 18:30 until 10:00 the next day as the number of minutes to then add on – which is 15 hours and 30 minutes = 15*60 + 30 = 930. This fulfils the second criteria – if the time today is after 6:30pm, then the minimum order time will now take them beyond 6:30pm the next day, meaning that their possible times aren’t until the day after the next day.
All this will look like this:

How can I put the plugin into “date-only” mode, so that it does not show times to customers?
You can do this by adding a line to your wp-config.php file, after the opening <?php near the top:
define('OPENINGHOURS_DATEONLY', true);
Alternatively, you can use a WordPress filter – add this to your functions.php, or wherever you add filters:
add_filter('openinghours_date_only', '__return_true');
How do I make it so that the default choice is blank (i.e. no time chosen by default)?
You can do this using the openinghours_frontend_initialvalue filter in an mu-plugin.
i.e.
Place a file in wp-content/mu-plugins/no-initial-value.php (you may need to create the mu-plugins directory if it does not yet exist):
<?php

add_filter('openinghours_frontend_initialvalue', '__return_empty_string');

add_filter('openinghours_frontend_initialvalue_formethod', '__return_empty_string');

add_filter('openinghours_frontend_initialvalue_formethod_raw', '__return_empty_string');

add_action('wp_footer', function() {

	?>

	<script>

		jQuery(document.body).on('openinghours_initialised', function() {

			jQuery('#openinghours_time').val('');

		});

	</script>

	<?php

});
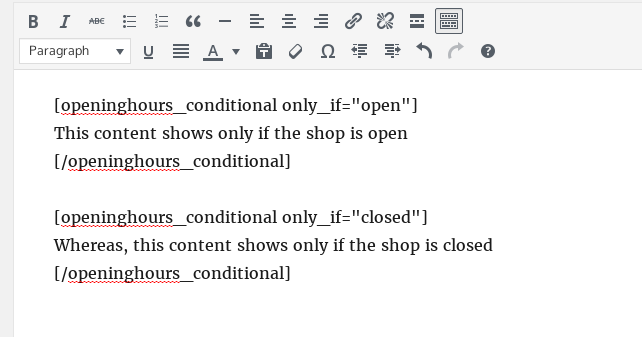
How can I show some content only if the shop is open/closed?
A shortcode, [openinghours_conditional only_if=”(open|closed)”], is available.
Content contained inside the opening and shortcode tags will only render if the shop is open/closed, according to your default opening hours (i.e. it does not depend upon considerations of category, or minimum order fulfilment times).
e.g.
[openinghours_conditional only_if=”closed”]The shop is closed now.[/openinghours_conditional].
Remember that you must exclude pages with conditional content from cacheing plugins.
Further parameters are available to use the hours for a specified shipping method: shipping_method=”(shipping_method_textual_id|default)”, instance_id=”(shipping_zone_instance_id)”, consult_slot_usage=”0|1″. The shipping method textual ID is the one used internally in WooCommerce; ask the shipping method extension author, or a PHP developer to help you, if you do not know how to find this. The parameter for consulting slot usage (default=0) controls whether the availability of slots should be taken into account or not.
How can I accept an empty time?
If you wish to accept an empty time from the customer, then use this code snippet as an mu-plugin (or in your functions.php):
add_filter('openinghours_check_cart_items', 'my_openinghours_check_cart_items');

function my_openinghours_check_cart_items($r) {

  return empty($_POST['openinghours_time']) ? true : $r;

}
This requires version 1.6.12 or later of the plugin.
My shop has opening hours that go across midnight. How do I configure this?
If you are open past midnight, then enter two sets of opening hours (one until 24:00, the other starting from 00:00 the next day).

(If you close at midnight, enter that as “until 24:00”, not “until 00:00”).
How can I adjust the styling of the line added to WooCommerce emails?
To do this, apply CSS styling. The paragraph has CSS ID openinghours_adminlabel, and the chosen time has CSS ID openinghours_email_timechosen.
One way to do this is by adding a CSS rule via a code filter. e.g.:
add_action('woocommerce_email_header', function ($email_heading, $email) {

  // Adds CSS to "new order" email only

  if ($email->id != 'new_order') return;

    ?>

    <style type="text/css">

      p#openinghours_adminlabel { font-size: 28px; }

    </style>

  <?php

}, 20, 2);
Which order statuses cause an order to be allocated a slot?
If you have limited the number of orders that can be placed within a specific time slot, then it is important to note that not all order statuses cause the order to count. By default, a cancelled or trashed order does not count.
However, you may have reasons for having other order statuses not count either – for example, you have created new order statuses, or your payment gateway creates orders before payment in a state (e.g. pending payment) which you do not wish to count (until the order is paid).
To accomplish this, you can use the openinghours_order_uses_slot filter. To do this:
- Create the folder wp-content/mu-plugins (if it does not already exist in your WordPress install).
- In it, create a file ending in .php, for example wp-content/mu-plugins/openinghours-changes.php .
- In that file, add content like so:
<?php

add_filter('openinghours_order_uses_slot', function($uses_slot, $order_id) {

$order = wc_get_order($order_id);

$order_status = $order->get_status();

if ('pending' == $order_status) $uses_slot = false;

return $uses_slot;

}, 10, 2);
In the above example, pending is the internal ID used by WooCommerce. It may not necessarily be the same as the text shown in the user interface.Please note that plugin coding customisations are not part of our standard support service. We can provide quotes for bespoke work, or you can hire a developer from various available sources, such as Codeable.
No time/date selector is appearing on the checkout. Why might that be?
Here are some things you should check…
- Is shipping turned on? If it is turned off for the store, then no selector will ever appear, because then there is no concept of delivery active. Check in WooCommerce -> Settings – if it is turned off, like in this screenshot, then turn it back on:

- Do you have any physical goods in the shopping cart? If all your products are marked in WooCommerce as “virtual”, then you need to make sure that you have enabled the setting in WooCommerce -> Opening Hours -> Settings to include virtual goods (usually, virtual goods don’t require any particular time to be associated with them):

One user was automatically importing products into WooCommerce via a marketplace-integration-automation plugin. That plugin was marking all goods as virtual, which was not what they wanted (they were physical goods). - Have you configured the plugin to always show a time/date selector? One option asks under what conditions a time/date should be asked for. If you were expecting to see one, but did not, then check that setting:

- Have you configured the plugin to only notice goods in particular shipping classes? If you have ticked any boxes for particular classes, then others will be ignored. This might catch you out if you later create new shipping classes and forget to select them:

- Is your theme, or some other component, hiding it? Sometimes themes contain bad layering code and hide the date/time picker behind something else; or sometimes other plugins have bugs and try to get involved when they shouldn’t. Test this by temporarily de-activating all other plugins, and switching to a default theme, and then reload the checkout page. If it is not there, then you should re-activate the other components in a “bisection” method, trying to narrow down eventually to which particular one is the culprit. e.g. Re-enable half of them and reload the checkout page; if it is still there, then those weren’t the faulty ones – the other half were. If it is gone, then one of the re-enabled ones is faulty. Choose half of those half, and go again…
- Perhaps it is really there? Sometimes we’ve had support requests from people who presumably had long days: it was there, but they overlooked it.